When your server slows down or can’t keep up with new software, it might be time to add more memory. This might sound hard, but with the right help, it’s easier than you think. In this guide, we’ll show you how to upgrade your server’s memory so it works better without any stress.
By upgrading, your server will run faster, handle more tasks at once, reduce downtime, and work more smoothly. Whether you have a small business or a large data center, knowing how to buy server memory is important. Let’s get started and make your server faster again!
Why Upgrade Your Server’s Memory?
Before we dive into the how, let’s talk about the why. Servers, like any other machines, have limits. When those limits are pushed, everything starts to lag. Maybe your applications are taking forever to load, or your server can’t handle the traffic during peak hours. These are all red flags pointing toward a memory upgrade.
Adding more memory helps your server run smoothly, prevents it from crashing during heavy loads, and allows it to handle more tasks simultaneously. Plus, memory upgrades are often cheaper and more effective than upgrading the entire server. The real question is not if you should upgrade, but when.
Assess Your Current Server Setup
The first step is to understand what you’re working with. Take a close look at your server’s current specs to know how much memory it already has and what its limits are. This will help you figure out how much more memory you can add and what kind of memory modules are compatible.
Servers come in different makes and models, each with specific requirements for memory upgrades. Look for documentation or consult the manufacturer to find out the maximum memory capacity.
Check the current memory:
Access your server’s BIOS or operating system settings to see how much memory is installed and what type of RAM is being used.
Evaluate memory usage:
Monitoring tools can help you see how much memory is being used during peak operations. If your server is using more than 80% of its memory regularly, it’s time for an upgrade.
Choose the Right Memory
Now that you know your server’s memory capacity, it’s time to shop for the right kind of memory. Not all RAM is created equal, so make sure you’re buying memory that matches your server’s specifications.
- Check compatibility: You’ll need to buy memory that’s compatible with your server’s motherboard. This typically means selecting the right type of RAM (DDR3, DDR4, etc.) and ensuring it meets your server’s voltage and speed requirements.
- Memory size: Decide how much additional memory your server needs. It’s always good to leave some room for future growth, so buying a bit more than your immediate need can save you trouble down the road.
- Brands matter: Investing in high-quality, reliable memory from trusted brands ensures that your upgrade is worth it. Cheap memory modules may fail faster and cause performance issues.
Backup and Prepare
Before you start pulling out hardware, take a moment to back up all essential data on your server. While upgrading memory is generally safe, there’s always a slight risk of something going wrong. Backups ensure that you can restore your system quickly if needed.
- Schedule downtime: Make sure to schedule the upgrade during non-peak hours. This will minimize the disruption to your business operations.
- Power down: Always power down the server and unplug it before opening the case. Working with live systems can not only damage the server but also pose a safety risk.
- Gather tools: Have a small screwdriver ready to remove screws from the case, and consider using an anti-static wrist strap to prevent static discharge from damaging sensitive components.
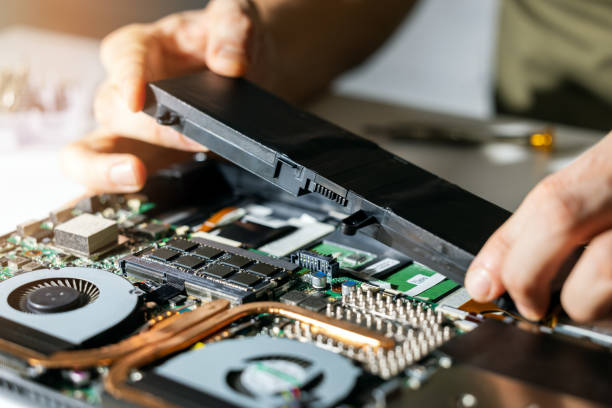
Install the New Memory
With everything backed up and ready, it’s time to install the new memory. This step may vary slightly depending on your server model, but the general process is pretty much the same across the board.
- Open the server: Carefully remove the case screws and open the server’s case. Take a moment to ground yourself by touching a metal surface before handling the memory modules.
- Locate the RAM slots: Most servers have designated slots for memory, usually found near the CPU. You may need to remove a plastic cover or metal bracket to access these slots.
- Install the new RAM: Line up the new memory modules with the slots, making sure they match the notches in the socket. Firmly press the modules into place until you hear a click, indicating that they’re securely seated.
Test and Configure
With the new memory installed, it’s time to power up your server and make sure everything is running smoothly. This step is crucial to ensure that your server recognizes the new memory and operates correctly.
Check memory detection:
Enter your server’s BIOS or UEFI settings during startup (usually by pressing a key like F2, F10, or Del). Check the memory section to verify that the new RAM is detected and recognized correctly.
Run diagnostics:
Use server diagnostic tools or memory testing software to ensure the new memory is functioning correctly. Tools like MemTest86 can help identify any potential issues.
Update server settings:
Depending on your server’s configuration, you might need to adjust settings related to memory, such as enabling memory caching or changing performance profiles. Refer to your server’s manual or manufacturer’s recommendations.
Monitor Performance
After upgrading, keep an eye on your server’s performance to ensure that the memory upgrade has had the desired effect. Monitoring helps you confirm that the new memory is improving performance and that no new issues have arisen.
- Monitor resource usage: Use system monitoring tools to track memory usage, CPU load, and overall server performance. Look for improvements in speed and efficiency.
- Check application performance: Test the applications and services running on your server to ensure they are operating smoothly and efficiently with the new memory.
- Review logs: Keep an eye on system logs for any errors or warnings related to memory. Address any issues promptly to avoid potential problems.
Maintain and Optimize
To keep your server running at its best, ongoing maintenance and optimization are essential. Regularly check for firmware and software updates, clean your server hardware, and continue to monitor performance.
Firmware and software updates:
Ensure that your server’s firmware and software are up-to-date. Updates can improve performance, security, and compatibility with new hardware.
Clean the server:
Dust and debris can impact server performance and cooling. Periodically clean the server’s interior and ensure proper airflow.
Optimize settings:
Periodically review and optimize server settings based on changing workloads and performance needs. Adjust memory configurations or add more RAM if necessary.
Wrap-Up
Upgrading your server’s memory is a straightforward yet impactful way to enhance performance and extend the lifespan of your server. By following these steps, you can ensure a smooth upgrade process and reap the benefits of improved speed and efficiency. Whether you’re managing a small office server or a large data center, keeping your memory up-to-date is crucial for maintaining optimal performance.
Ready to take your server performance to the next level? Don’t wait for performance issues to slow you down. Upgrade your server’s memory today and experience the difference! Visit our site to learn more about the best options for your needs and make your server memory upgrade with confidence. Click here for more valuable insights and to find the perfect memory modules for your server.
FAQs
Q: How often should I upgrade my server’s memory?
A: It depends on your server’s workload and performance needs. Regular monitoring can help you determine when an upgrade is necessary.
Q: Can I mix different types of RAM?
A: It’s best to use matching memory modules (same type, speed, and size) to ensure compatibility and optimal performance.
Q: What if my server doesn’t recognize the new memory?
A: Check for proper installation, ensure the memory is compatible, and update your server’s BIOS if necessary.
Q: Is it necessary to use anti-static measures?
A: Yes, using anti-static measures like wrist straps helps prevent static electricity from damaging sensitive components.